My quest for perfect homemade pizza continues, and I am making steady inroads. Again after much reading of recipes, I settled on a cup of warm water with 3 little envelopes of active dry yeast. Let it hang out. In the stand mixer with dough hook, 3 1/2 cups of flour, 1/2 teaspoon sea salt, 1 1/2 tbsps of maple syrup, and 1/3 cup of olive oil. When yeasty water was frothy, added that, and ran the mixer on med-low until it formed a ball. Covered the stand mixer bowl with cling wrap and then let rise for an hour. At that point I divided dough into two, coated in a bit of olive oil, and put one ball in the fridge and one in the freezer (both in ziploc bags).
About an hour before ready to make pizza, took the fridge dough out and let it come to room temp for half an hour or so. Then, added a couple tbsps of olive oil to my biggest cast iron pan, and put my dough in and patted it out to near the edges. Set the oven to 170F and when it came up to temp, turned it off. Covered dough pan in cling wrap and put in the oven for 30 mins to proof.
For this one, I went a little different on toppings. Remember the weird gyro loaf I made? It had been in my freezer. I let it defrost in the fridge and cut it into thin slices. I took one package of frozen spinach and let defrost, and drained very well, including squishing out excess water using a paper towel. Sliced red onions and black olives. Thin slices of haloumi. And what about the base? There, my friends, I had a genius idea. About equal sized dollops of goat cheese, ricotta, and mascarpone, and, on the wise counsel of a foodie buddy, with red chili flakes and dried oregano whipped through it.
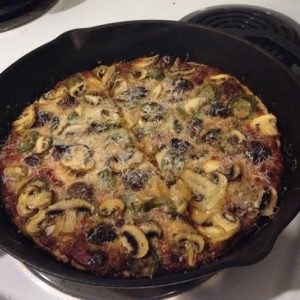
Once the dough proofed, I put the pan on the stove and added the base and toppings. Then I turned the stove to med-high and let the bottom cook a bit, and turned the oven up to 550F. Pizza went in for 15 mins, and came out looking like this:

The gyro meat and hallomi crisped up beautifully, and the crust was close to a Pizza Hut pan pizza texture. The white base was gorgeous– creamy and a bit zingy, and a perfect counterpoint to the salty toppings.
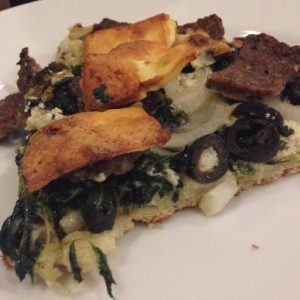
You could easily leave off the meat for a delicious veggie version that I think would be a real hit.
Now, for the second batch of dough, I took it out of the freezer and let it hang at room temp all day. Then I proofed it in the pan same as the first time, and carried on. For sauce, I again did boxed tomato puree, a little can of anchovies including their oil, dried basil, dried oregano, shredded parm (please use the real stuff, not the canned sawdust), garlic cloves, sugar, chili flakes, and cayenne. Use a stick blender, taste, and adjust seasonings as needed. Let me say that some variant on this will always be my go-to pizza/marinara-style dipping sauce, because it is splendid. Toppings were bits of cooked sweet Italian sausage and mushroom with a mix of mozzarella and cheddar, with some parm shredded on once it came out, and oh how quickly we gobbled it up!
Now look, I get that if you’re in a place where pizza is pretty much the easiest, most reliable food to have delivered, it doesn’t make sense to invest this much time and energy in making it, so it might not be your sportsball watching go-to to make at home. So let me hook you up with additional options.
First among these is buffalo chicken dip. If you have a stovetop smoker (and I’ve told you before that you should!), smoke some boneless chicken of your choice for half an hour or so. If you want to season it (I like packaged taco or fajita seasoning mix for this purpose) , do, but it’s not strictly necessary. Or feel free to shred a store-bought rotisserie chicken or use any leftover cooked chicken you’ve got . Put it in an oven-safe casserole dish and pour in a small bottle of Frank’s or similar hot sauce, a small bottle of ranch dressing (if you like blue cheese, go on with your bad self and use that), and a small package of cream cheese. Using a fork, roughly mix the stuff together. Cover in a layer of shredded cheddar, and pop in the oven at 375F for 30 minutes or so, until the cheesy top is melty and bubbly. Serve with bread, tortilla chips, carrot/celery sticks, or whatever else you like. It’s a crowd pleaser.
If, however, you want real wings and not just dip, let me tell you the secret. Well, it’s not a secret, really, apparently Cook’s Illustrated started the trend, and there’s loads of knockoff recipes. Take 2 dozen chicken wings and put them in a ziploc bag. Add a tbsp of baking powder (please make sure it’s powder, NOT baking soda) and a 1/2 tsp of salt, and shake it about. Now lay the wings skin side up on a baking rack set over a foil-covered pan. Put in the lower rack of the oven at 250F for 30 minutes. Then move the chicken to the higher rack and set oven to 450F, and cook an additional 35-50 mins depending on size of your wings. This will provide you crispy, juicy wings without the oil splatters and mess of deep frying, and you can do many more at once depending on your oven size. My saucing recommendations:
For traditional wing sauce, I use a 3oz bottle of hot sauce, a 1/2 stick of butter, 3 cloves of garlic grated on the microplane, a couple of splashes of vinegar, some powdered cayenne, and some Tobasco, all according to taste. Just sauce the wings when they’re hot out of the oven.
Remember the yummy ginger/garlic/green onion dipping sauce I made for steamed chicken? That is utterly glorious on these crispity wings!
And, if you want another sort of Asian wing sauce, a delicious, addictive, sticky-savory, “what IS that deliciousness” sauce, then start with a sesame paste. You could use tahini if it’s on hand. I didn’t have any, so I toasted a 1/2 cup of sesame seeds in a dry pan, then put in my food processor with 1 tbsp of sunflower oil. So, now you’ve got toasty sesame paste. Add an equal amount of miso paste. Add rice wine vinegar, soy, fish sauce, ginger paste (or fresh grated), brown sugar, and Sriracha. If you want to add a few squirts of wasabi paste, that’s good, too. To use with the wings, once they’ve done cooking at 250F, coat them in the sauce before returning to the oven at 450F.
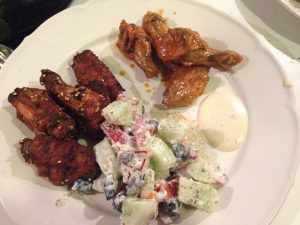
Now, for other chicken parts, just use the Asian sauce as a marinade and then bake at 375F for 40-50 minutes, and feel free to use the cooked sauce to toss with rice noodles or coat roasted veg.
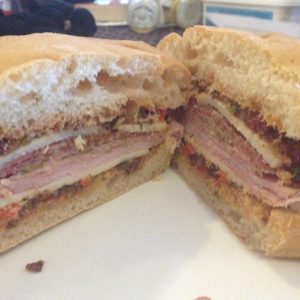
Another game day food you might want to make is Muffuletta. I jumped off from here: http://www.foodandwine.com/recipes/emerils-muffuletta. Basically a mix of different types of olives, pickled veg, olive oil, vinegar, and Italian seasonings, blitzed in the food processor and left to hang out for at least a day to really meld the flavors. Slather it on bread and add loads of Italian cold cuts and a couple of cheeses.
Happy eating, and hope your team wins the uh, whatever your championship thing is called!
 I
I